

In today’s digital world, a website is no longer a luxury for businesses—it’s a necessity. Whether you’re running a local business, offering professional services, selling products online, or building a personal brand, a website helps establish credibility, reach new customers, and provide information about your business 24/7.
Nowadays, it’s true that AI can be used for developing websites quicker than ever. However the results are often less beginner friendly because it serves the files in programming languages which most of the non-coders will not understand.
This is where WordPress, as a website development platform, stands out. As the world’s most popular content management system, WordPress combines beginner friendliness with scalability. You can start with a simple website and gradually expand it with custom designs, advanced features, SEO tools, and plugins.
What is WordPress and Why Should We Use It?
WordPress is a content management system (CMS) that allows you to create, manage, and publish website content without having to write code. First released in 2003 as a blogging platform, WordPress has evolved into a powerful website-building solution used by individuals, small businesses, large organizations, and online stores worldwide. Today, it can be used to create almost any type of website, including business websites, portfolios, blogs, membership sites, and eCommerce stores.
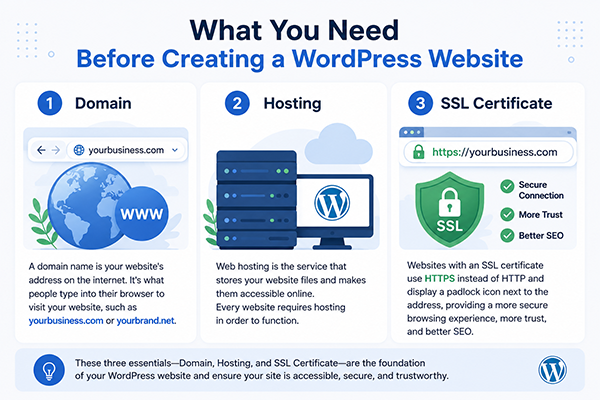
What You Need Before Creating a WordPress Website
Before you can create a WordPress website, there are a few essential components you need to prepare.
Domain
A domain name is your website’s address on the internet. It’s what people type into their browser to visit your website, such as yourbusiness.com or yourbrand.net. Choosing the right domain name is important because it represents your brand and helps visitors remember your website.
When selecting a domain name, try to:
- keep it short
- easy to spell
- relevant to your business or niche
- avoid using unnecessary numbers, special characters, or complicated words
- if possible, choose a domain extension such as .com, which remains the most recognized and trusted option worldwide.
Hosting
Web hosting is the service that stores your website files and makes them accessible online. If your domain name is your website’s address, hosting is the land where your website is built. Every website requires hosting in order to function.
If your business operates in Indonesia, we recommend using Pestahosting for your hosting provider. It’s reliable yet affordable, and the customer support can be contacted by WhatsApp. Meanwhile if your business operates globally, we recommend Hostinger as your hosting provider. It’s a reputable company, recognized, and serves worldwide businesses. You can get 20% discount as well!
In VRDA, we use both services to serve our clients so you don’t have to worry about their services and quality.
SSL Certificate
An SSL (Secure Sockets Layer) certificate encrypts data transferred between your website and its visitors. Websites with an SSL certificate use HTTPS instead of HTTP and display a padlock icon next to the address, providing a more secure browsing experience, more trust, and better SEO.
Today, many hosting providers include a free SSL certificate with their hosting plans, so in most cases, you won’t need to purchase one separately. Once activated, your website will be able to use HTTPS and provide a secure experience for your visitors.
How to Install WordPress and Complete the Initial Setup
Once you have a domain name, hosting account, and SSL certificate ready, the next step is to install WordPress. To install WordPress, log in to your hosting control panel and look for a tool called WordPress Installer, Auto Installer, or Softaculous Apps Installer. Select your domain name, choose your preferred administrator username and password, and start the installation process. After a few moments, WordPress will be installed and ready to use.
Once the installation is complete, you can access your WordPress dashboard by visiting:
yourdomain.com/wp-admin
Log in using the administrator credentials you created during the installation process. The WordPress dashboard is the control center where you’ll manage your website’s content, appearance, settings, and functionality.
Configure Your Website Title, Tagline, and Icon
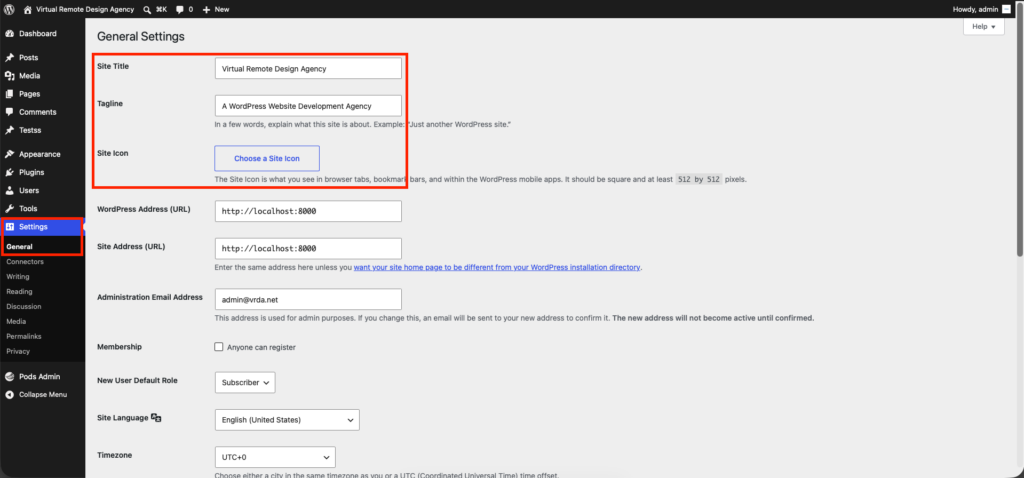
Before customizing your website, it’s a good idea to configure your basic site information. From the WordPress dashboard, navigate to Settings → General.
Here, you’ll find important fields such as:
- Site Title – The name of your website or business.
- Tagline – A short description that explains what your website is about.
- Icon – The icon that will show on the browser
For example:
Site Title: Virtual Remote Design Agency
Tagline: A WordPress Website Development Agency
After configuring your title and tagline, scroll down and click Save.
Your site title, tagline, and icon may appear in search engine results, browser tabs, and various areas of your website, depending on your theme settings.
Configure Your Permalink Structure
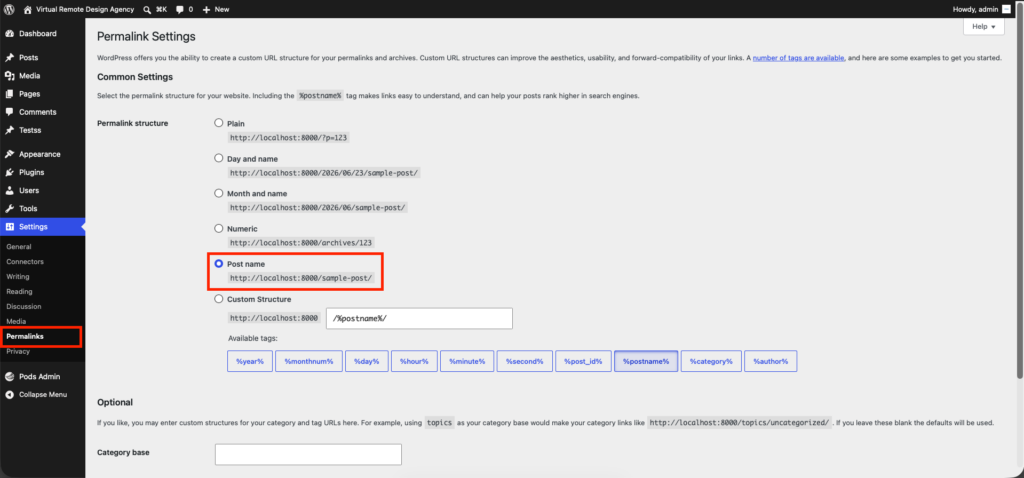
Permalinks determine how your website URLs are structured. By default, WordPress may use URLs that are not particularly user-friendly or SEO-friendly.
To update your permalink settings, go to Settings → Permalinks and select Post Name, then scroll down and click Save.
Instead of a URL like:
yourdomain.com/?p=123
WordPress will generate cleaner URLs such as:
yourdomain.com/sample-post
SEO-friendly URLs are easier for both visitors and search engines to understand, making this one of the first settings you should configure on a new WordPress website.
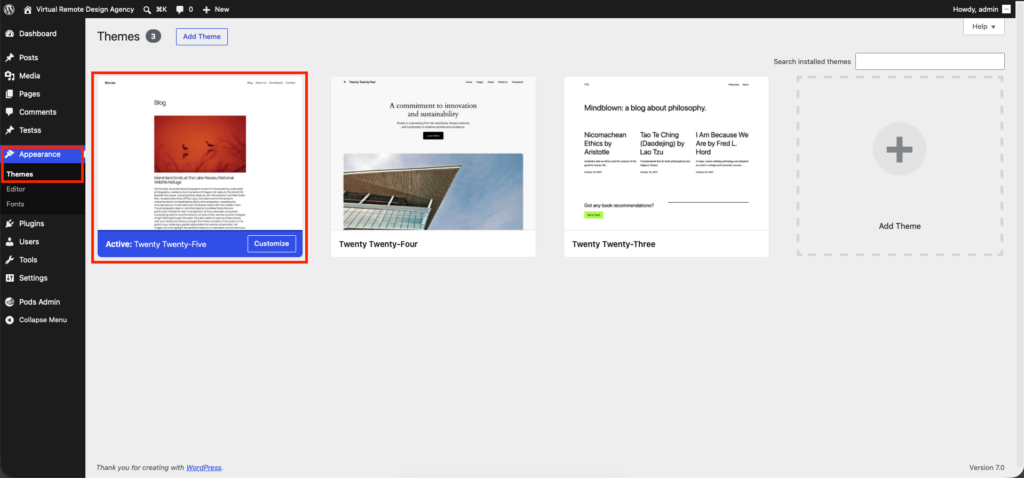
How to Choose and Customize a WordPress Theme
A WordPress theme controls the overall appearance of your website, including its layout, colors, typography, and design elements. Choosing a theme can be done by visiting Appearance → Themes
Use the Default WordPress Theme
For this tutorial, we’ll use the default WordPress theme that comes pre-installed with WordPress which is Twenty Twenty-Five. Using a default theme is a great option for beginners because it is lightweight, regularly maintained by the WordPress team, and fully compatible with Full Site Editing features. It also allows you to learn how WordPress works without relying on additional tools or premium themes.
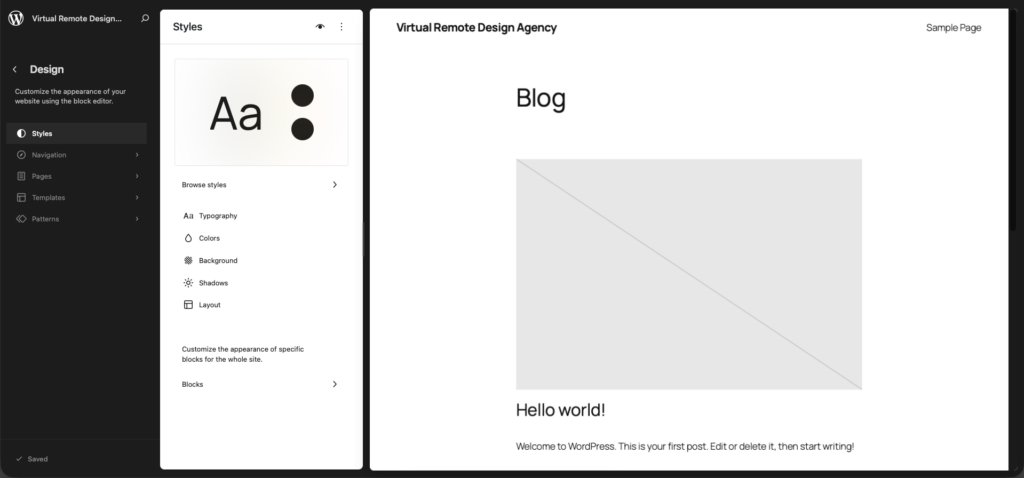
Customize Your Website Styles
To start customizing your website, navigate to:
Appearance → Editor → Styles
Here, you can modify your site globally:
- Brand colors
- Font families
- Font sizes
- Spacing and layout settings
Try to choose colors and typography that align with your brand identity. Consistent visual design helps create a more professional appearance and improves the user experience.
How to Create Pages with the WordPress Block Editor
Now that you’ve installed WordPress and customized your theme, it’s time to start creating content. WordPress includes a built-in block editor called Gutenberg, which allows you to build pages visually without writing code.
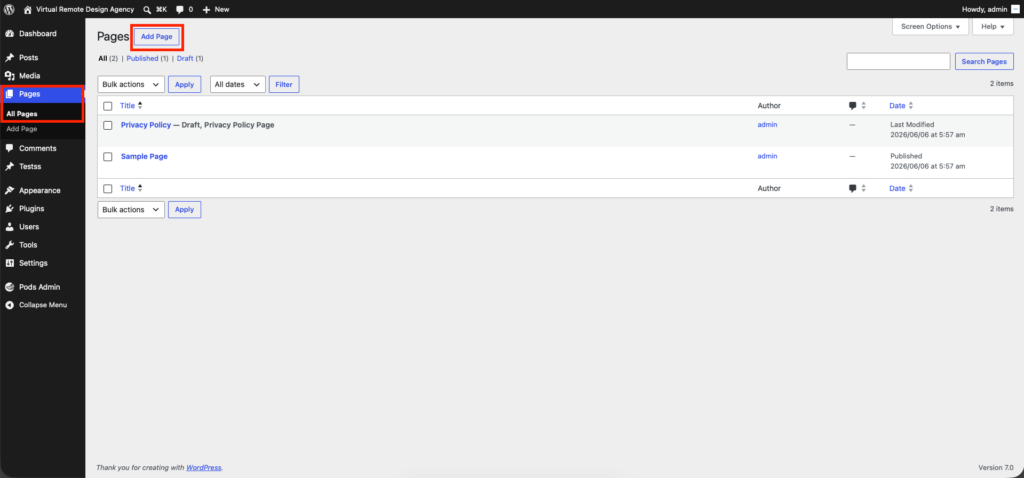
To create a new page, navigate to Pages → Add New Page from your WordPress dashboard. You’ll be presented with the block editor, where you can begin building your page by adding content blocks such as headings, paragraphs, images, buttons, columns, and more.
Add a Page Title
The first element you should add is the page title. Click the title field at the top of the editor and enter a descriptive title for your page.
The page title serves several purposes:
- Helps visitors understand the page’s purpose.
- Improves website organization.
- Can be used by search engines to better understand your content.
Once you’ve added a title, you can begin creating the page content below it.
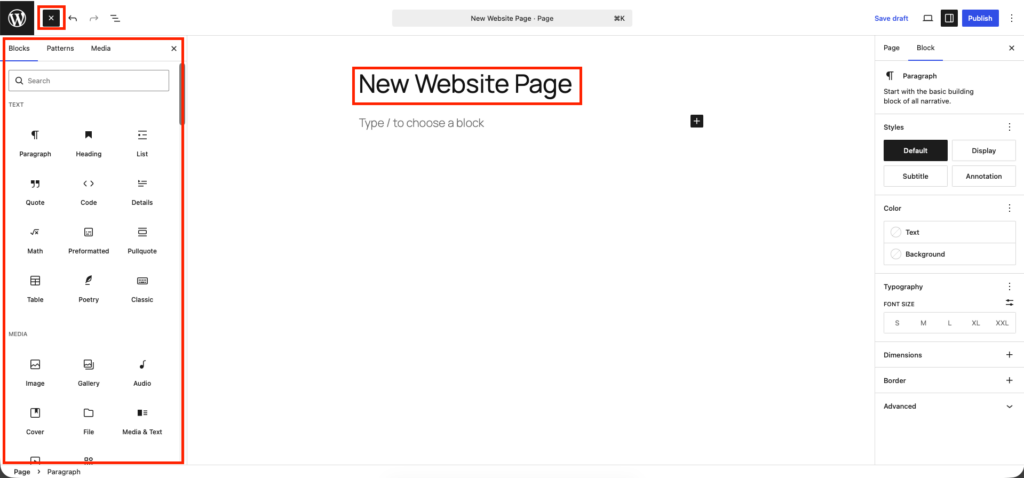
Add Content Using Blocks
Gutenberg works by allowing you to insert individual blocks for different types of content. To add a new block, click the + icon on the top left of the editor.
Some of the most commonly used blocks include:
- Heading for section titles.
- Paragraph for text content.
- Image for displaying photos and graphics.
- Button for calls to action.
- Group for grouping elements.
- Columns for multi-column layouts.
You can rearrange blocks by dragging and dropping them into different positions, making it easy to experiment with your page layout. As you build your page, try to organize content into clear sections so it improves readability and helps visitors quickly find the information they’re looking for.
Preview Your Page
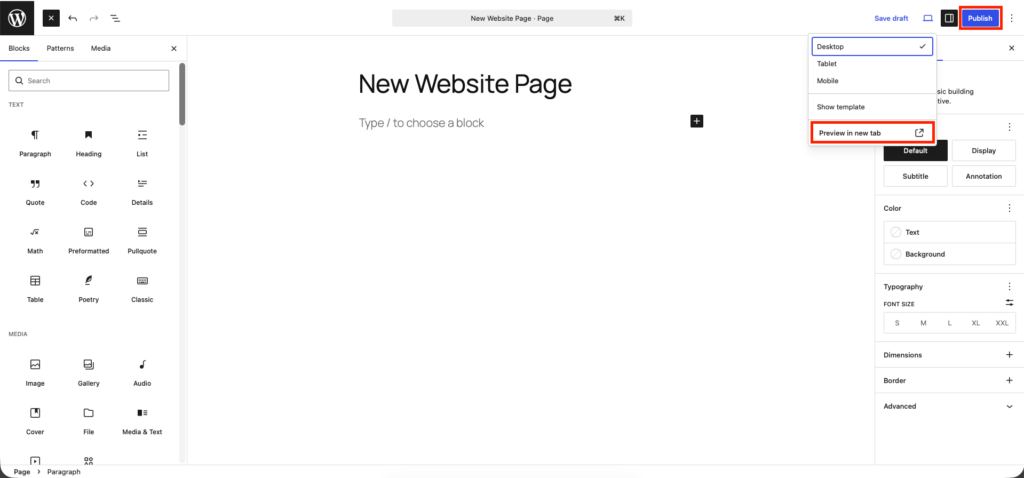
Before publishing, use the Preview in new tab button which appears after you click laptop icon on top right of the editor. You can also review the layout on desktop, tablet, and mobile views to ensure the content looks clean and easy to read across different devices.
If you notice any issues with spacing, alignment, or formatting, you can return to the editor and make adjustments before publishing.
Publish Your Page
Once you’re satisfied with the content and layout, click the Publish button in the top-right corner of the editor. Your page will immediately become available on your website.
Don’t worry about making everything perfect on your first attempt. One of the advantages of WordPress and Gutenberg is that you can edit and improve your pages at any time. As you become more familiar with blocks and layouts, you’ll be able to create increasingly professional and engaging pages without relying on third-party page builders.
How to Create a Custom Header and Footer in WordPress
The header appears at the top of every page and typically contains your logo, navigation menu, and other important links. The footer appears at the bottom of the page and often includes copyright information, contact details, social media links, and additional navigation options.
Since we’re using a Full Site Editing (FSE) theme, WordPress allows us to customize both areas directly within the Site Editor without installing any additional plugins.
Customize the Header
To edit your header, navigate to:
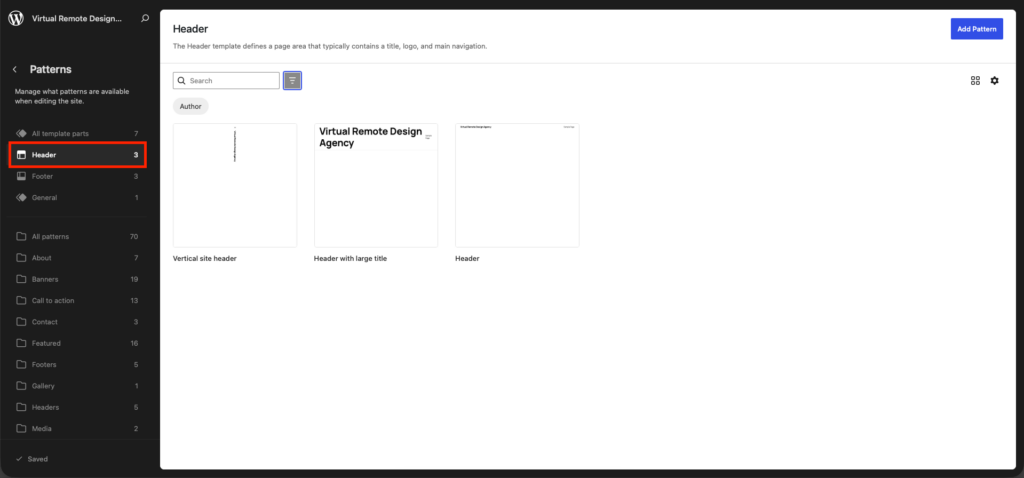
Appearance → Editor → Patterns → Header
You can choose the existing header or create a new one instead.
If you choose to create one, a typical website header may include:
- A site logo
- Navigation menu
- Call-to-action button
To add new elements, click the + button and insert the appropriate block. For example, you can use the Site Logo block to upload your logo or the Navigation block to create a menu linking to your website pages.
Keep your header simple and easy to navigate. Visitors should be able to quickly understand where they are and how to find the information they need.
Create a Navigation Menu
The navigation menu helps visitors move between different sections of your website. To create/edit a navigation menu, navigate to:
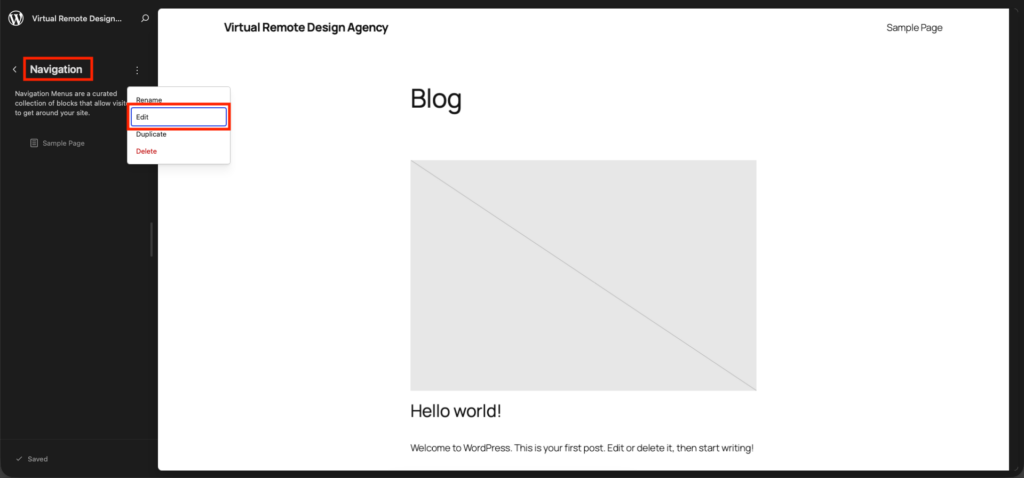
Appearance → Editor → Navigation
Then click the three dots on the right of the “Navigation” title and click Edit. Here you can add pages, custom links, and even the submenu.
A clear navigation structure improves usability and helps visitors explore your website more efficiently.
Customize the Footer
To edit your footer, navigate to:
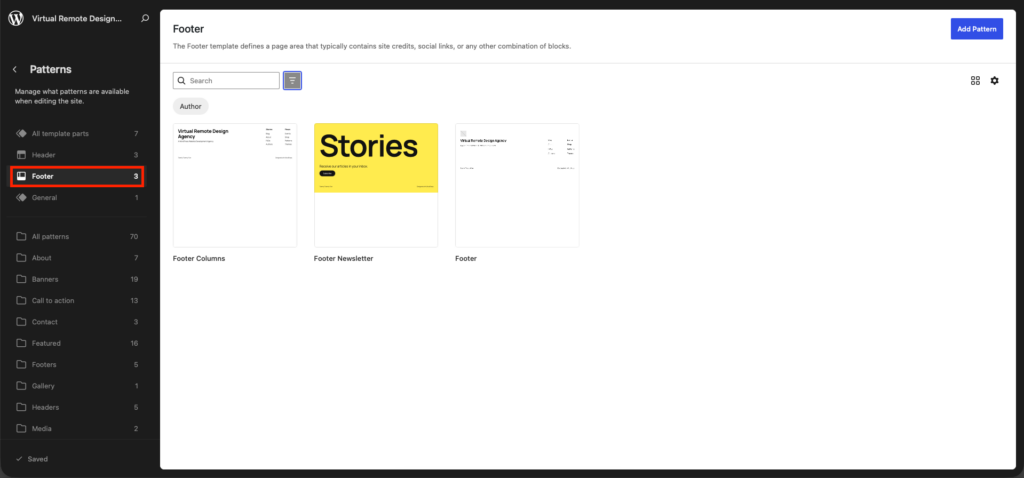
Appearance → Editor → Patterns → Footer
You can choose the existing header or create a new one instead.
If you choose to create a new one, common footer elements include:
- Copyright notice
- Business information
- Contact details
- Social media links
- Additional navigation links
You can add these elements using standard Gutenberg blocks such as Paragraph, Columns, Social Icons, and Navigation blocks.
Unlike the header, which should remain focused and concise, the footer can contain supplementary information that visitors may find useful.
Essential WordPress Plugins to Improve Your Website
One of the reasons WordPress is so popular is its extensive plugin ecosystem. Plugins allow you to add new features and functionality to your website without writing code. Whether you want to improve search engine visibility, strengthen security, or automate backups, there’s likely a plugin that can help.
SEO Plugins
Search engine optimization (SEO) helps your website appear in search engine results when potential visitors are looking for information, products, or services related to your business.
One of the first plugin you should set up is Google Search Console. It allows you to monitor your website’s search performance and discover the search queries that bring visitors to your website.
For on-page SEO management, you can use SEOPress. This plugin helps you:
- Create custom SEO titles and meta descriptions.
- Generate XML sitemaps.
- Configure social media sharing settings.
- Manage redirects.
- Improve overall SEO optimization.
Together, Google Search Console and SEOPress provide a solid foundation for monitoring and improving your website’s visibility in search engines.
Security Plugins
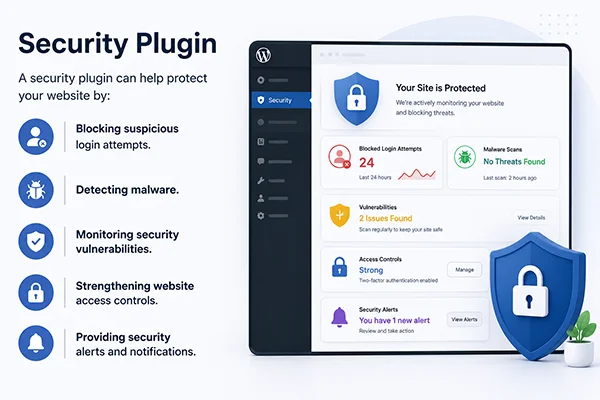
Website security should never be overlooked. A security plugin can help protect your website by:
- Blocking suspicious login attempts.
- Detecting malware.
- Monitoring security vulnerabilities.
- Strengthening website access controls.
- Providing security alerts and notifications.
One of the security plugins that we usually use for our clients is WordFence, which gives you decent protection to your website for free.
Backup Plugins
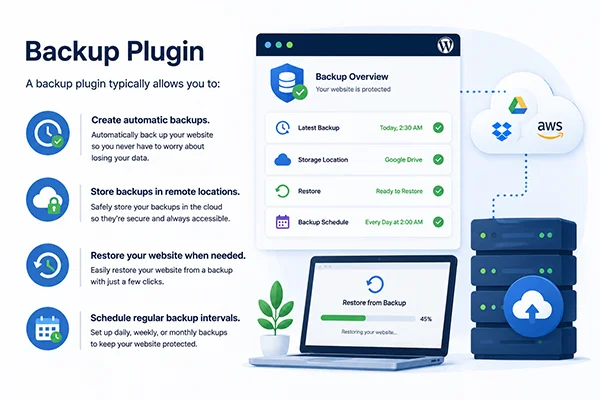
Backups act as your website’s safety net. If your website experiences unintended activities, a recent backup can help you restore your website quickly. A backup plugin typically allows you to:
- Create automatic backups.
- Store backups in remote locations.
- Restore your website when needed.
- Schedule regular backup intervals.
Many hosting providers include backup features in their plans, but having an additional backup solution can provide extra peace of mind. One of the backup plugins we usually use is Updraft.
Keep Your Plugin List Lean
Plugins are incredibly useful, but more isn’t always better. Before installing a new plugin, ask yourself whether the feature is truly necessary and whether it can be achieved using existing WordPress functionality.
A smaller collection of well-maintained plugins is usually easier to manage, more secure, and better for website performance than installing dozens of plugins you rarely use.
Conclusion
Building a website may seem overwhelming at first, but WordPress makes the process far more accessible than many beginners expect. One of the greatest advantages of WordPress is its flexibility. You can start with a simple website today and gradually expand it as your business grows. Whether you want to publish content, generate leads, improve your search engine visibility, or even launch an online store in the future, WordPress provides the tools and scalability to support your goals.
(Bonus) WordPress.com vs WordPress.org: What’s the Difference?
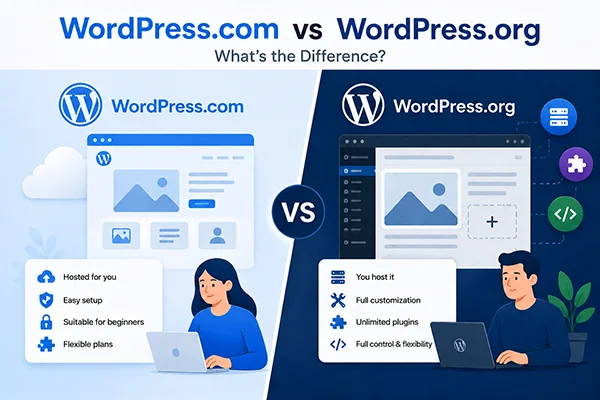
If you’re new to WordPress, you may have noticed that there are two different platforms: WordPress.com and WordPress.org. Although they share the same name and are both based on WordPress software, they serve different purposes and offer different levels of flexibility.
WordPress.com
WordPress.com is a hosted website-building platform. It handles hosting, security, maintenance, and technical updates for you, making it a convenient option for beginners who want a simple setup process.
With WordPress.com, you can create a website without purchasing separate hosting. However, certain features, customization options, and plugin support may be limited depending on the plan you choose.
WordPress.org
WordPress.org provides the free, open-source WordPress software that you install on your own hosting account. This approach gives you complete control over your website, including its design, functionality, performance, and hosting environment.
With WordPress.org, you can:
- Install any theme you want.
- Use plugins without restrictions.
- Customize your website freely.
- Access your website files and database.
- Choose your preferred hosting provider.
While it requires slightly more setup, it offers significantly greater flexibility and ownership.
Which One Should You Choose?
For most businesses, freelancers, agencies, and website owners who want long-term flexibility, WordPress.org is usually the better choice. It provides complete control over your website and allows you to expand your site’s functionality without being restricted by platform limitations.
Since this tutorial focuses on purchasing your own domain name, choosing a hosting provider, and installing WordPress yourself, the steps described throughout this guide are based on WordPress.org.